Monday, November 22, 2010

Advanced CG Week 10

There isn't a whole lot to show this week as far as progress goes. That doesn't mean there hasn't been any, but rather, it doesn't make a lot of sense to present it. It's been a matter of animating, rendering, and touching up shots with problems. It would be a poor use of time to upload all the individual scenes I've been animating, and to see them out of context would lessen the impact when it's finished. But to give a quick run-down of what I've been up to this past week, I'll list off some things.

I've gotten the hair dynamics to move how I want when animated. I got the light linking down for the Hero, and edited his texture and subsurface scattering a bit. I've animated a large portion of the scenes, and begun rendering them. I've worked on the special effects for when the shadow monsters begin to appear, and I've played around with massive so I can start incorporating the simulations into the actual animation.

Right now it's a matter of tweaking massive, and animating my life away until final crit time. Since a blog with only text is pretty bland, I'll show you some shots from some scenes I've been animating. Spoiler alert, one of the images shows how the main character dies. Just kidding. Or am I? Stay tuned.

Tuesday, November 16, 2010

Advanced CG Week 9


This week was spent doing all sorts of things, as per usual. I perfected the hair, and got the dynamics working. I created the fresco's for the tablets and arranged them exactly how I want them. I created the center-piece, and have it fully animated with set driven keys. I worked on lighting for the scene, and have begun animating. The above shot is the last frame of a scene. The camera is static, so I'm going to matte-paint some stuff once it's completely rendered.


This image above shows what i've done with the tablets. The paint needs a bit more weathering (sp?), since there are a few points that have pure color, and since they're old, it should look pretty worn in all spots. But other than that I'm really happy with how they've turned out. There's a shadow going down the left tablet right now, but all I need to do is turn light linking off for a certain light, so any criticism on that will be redundant.


The images the tablets have portray a story, and are meant to give the audience a little foreshadowing for what will happen. The final image in the fresco is supposed to represent the shadow guys emanating from the altar of the sword. Speaking of the altar....

I spent way more time than I though I'd have to to get this thing to look like I wanted it to. One of the main problems was that I wasn't sure exactly how I wanted it to look, and definitely didn't know how to get it to work. I had always had a general idea, but to actually figure out the movement of the individual pieces was time consuming, and animating it even more consuming.

I need to play around with the texture a bit more, but for the most part that's how I want it to look, and I'm happy with the color palette. The main issue I ran into when creating it was the sculpting. Each peace has displacement maps rather than actual geometry extruding from them. Had I gone the traditional route, and modelled faces into it, I'd be working on that until the cows came home - if it took a year for cows to travel from where-ever they are, to wherever their home is.

The big issue I ran into was that the original geometry I sculpted from was way too low rez. So all the detail of the faces I had sculpted had to be calculated over the span of four polygons. Due to that, my faces got really warped and not at all how they looked like in Z-brush. Though you don't see the center piece for that long, and there aren't any extremely close shots of it, I thought it was really important for it to look good. So I went ahead and upped the resolution of the base geometry, and resculpted both the womans face and the skull face. So it took me twice as long to get it looking right.

I also spent a good deal of time in massive getting the animations to blend smoothly, and have been playing with the brain to get the agents to do my bidding. There isn't really anything that exciting to show, picture wise, so you'll have to take my word for it. I have about 30 agents placed, and expect to have around 50 or so. It'll look pretty neat. So for the rest of the week I will be animating, rendering, and working on massive. Exciting stuff to say the most.

Monday, November 8, 2010

Advanced CG Week 8


This past week has been spent on a lot of things, and I've accomplished a lot. As you can see from the above shot, I've got a character with hair and eyebrows finally. After my previous blog post the issue that I had thought I had resolved turned out to not be. I also ran into another issue that has been causing me a ridiculous amount of problems with blend shapes (another thing I thought I had resolved earlier), and hair is still giving me a little bit of trouble. However, I've ironed out a great deal of the kinks, and almost everything is in working order now.


I still have some playing around to do with the environment and character, but it's really starting to come together. With the addition of the hair and eyebrows, the character looks a lot more unified with the environment, and is a lot closer to the original concept drawings I had made at the beginning of the term.


Above is a shot of the near final lighting sceme. I finally added the lamps near the altar, and I'm happy with the contrast between the blue and orange lighting. I was going for a complementary scheme on top of some earthy browns and dark blues. I still need to figure out what lights will cast shadows, and it'll take some tweaking so it doesn't take a million years to render.


These shots give a more detailed look at what the character looks like with hair. I also went back into his textures and gave him some more grunge, so it looks like he's been through some trials and tribulations.


With the hair I still get a few strange reflections where it picks up too much light. I imagine it has something to do with my specularity and gloss settings, but it's looking a lot better than it used to. If you look back at my older posts, you can tell that it's gone a long way. For the amount of time that I spent styling and grooming the hair, I could become a legitimate hair stylist.


Above is a working model of the shadow character agent in Massive. I have the scarf fully functional and dynamic. It needs a little tweaking with the gravity and friction settings, but overall I'm really happy with how it looks. It makes Massive chug a little bit, but I don't need too many agents so I'm not too worried about it.


I have a good amount of animation loops imported into Massive, and am currently getting them to blend together and adding them to the action tree of the agent. It's going slow, and Massive is the least user friendly software I've ever used, but so far its chugging along.

As far as problems I've run into this past week, they've been bountiful. Blend shapes still affected the body geometry, insteady of just the face as I had intended. I'm not exactly sure what went wrong, but I think it had to do with the naming convention I had for the blend shape geometry. I ended up deleting and reapplying the blend shapes to a proxy mesh, and then made a blend shape between the proxy and the main mesh. I had to paint blend shape weights onto the proxy mesh so that only the face could be influenced, and I'm pretty sure that did the trick.

I also am having a strange pole vector translation problem, and the hair gets a bit funky depending on the light angle. These are all relatively negligible things, so they'll be fixed in due time. Next up on the agenda is starting to finalize my Massive sims, and start animating the main animation. I also am researching how to use particles to make the shadow people appear. Until next week, stay classy.


Monday, November 1, 2010

Advanced CG Week 7

This week has been spent on two things. The first has been getting my character into Massive without unforgivable, unspeakable things happening. The picture below is what nightmares are made of. It is the true face of terror and despair. What makes the situation worse is that it took a great deal of time and effort to get it to look like anything at all.


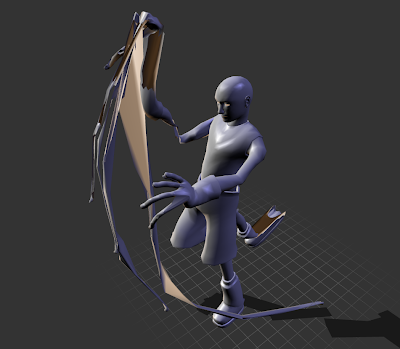
After some consultation and experimentation I more or less figured out the problem, which had to do with a combination of joint orientation, channels that should have been frozen, z-axis orientation, preferred angles, pole vectors, constraints, skin weights, and a bunch more. Basically everything was wrong to some degree (for massive), and needed to be redone. So a great deal of time has been spent re-rigging the character in the hopes that it won't make Massive become a fear-engine that bores a hole between this this dimension and some other dark realm of unfathomable horror.


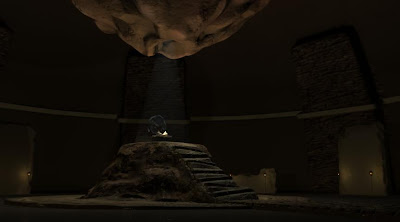
After spending a great deal of time with the rig, I needed a break. I decided to take some time and refine my environment. It's not blatantly noticeable, but I went back into each and every texture in the environment and added more detail. I also messed around with the specularity and reflectivity of a lot of the objects, as well as added the lamp posts and crystals to the environment.


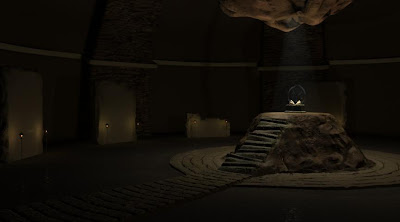
After I added more props to the scene I started messing with the lighting. What you see in these pictures aren't final, but they're starting to get to the final stage. I still need to figure out a way to optimize the caustics of the lamp crystals, and play with some light relationships, but for the most part its starting to represent my original vision.


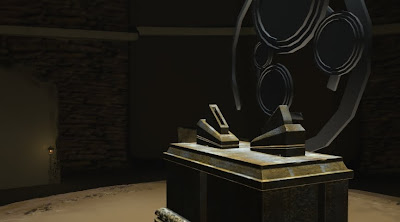
Above is a picture of the alter that holds the sword. I hadn't shown it in a while, and figured I'd get a few up-close shots of it, since I think it looks pretty cool, and wanted to see what it was like in the entire environment.


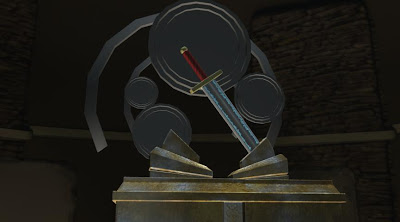
Pictured above is the sword, which is currently a work in progress. Right now I have it placed within the sword altar, but it will be the sword the Hero (who I have named Lliam) is holding in the animation. The textures need some work, but I at least have the shape and general colors how I want them.


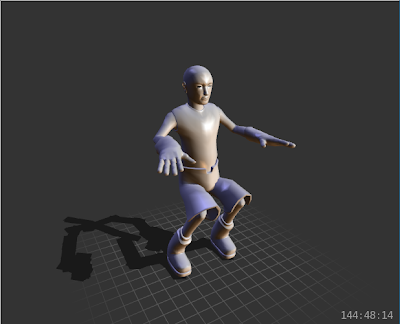
After a ridiculous amount of effort, I finally got my one rig to transfer into Massive without Wes Craven-esque deformations. I put some basic animation on the skeleton, and bound the geometry onto it, and so far it seems as if everything deforms ok.


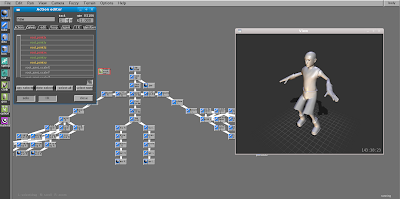
As pictured above, one of my triumphs is that the bone tree actually looks like a figure. Before, when I imported my skeleton into massive, it looked like a jumbled mess. This was because of the character being oriented down the wrong axis, and a few other things that I fixed. What those other things are, I'm not entirely sure, since I tried so many things, but so far it works, and that's all I care about.

Next on my agenda is to get some Massive animation blends together and tested so I can start simming some scenes. I also want to get the lighting finished, and get the Hero character completely finished with texturing, hair, and scarf so I can start animating. Once I get some scenes rendering I can work on effects and massive on the side.

Tuesday, October 26, 2010

Advanced CG Week 6


This past week has been spent on a lot of different things that will allow me to start the actual animation process of the project. I've made a lot of progress, and while it will take some time to get the effects and massive elements worked out perfectly, everything else is in pretty good order. Some things I've done this week, in no particular order, is prop work, lighting and texturing the environment, finalizing the character rig, facial blend shapes, eyes for the character, finalizing the model of the character, caustics in renderman, and trying to get them all into one scene.


Pictured above is a test to make sure that the scale between the character and environment is correct, and I also just wanted to see what it looks like. The lighting has a ways to go for when I start working on the legitimate scenes, but so far I think it looks really cool. Correction, it is really cool. Fact.


Another thing that took a bit of time was getting the scarf and shoulder pads of the character to look good and deform correctly with the body. I had to go in and work on the blend shapes so that the shoulder pads moved with the shoulders, and the scarf moved with the shoulder pads. It also had to deform with the face, but have the influence fall off as it went down the scarf and not have a 1-1 thing going on.

The shot above is a few frames into a walk cycle I'm working on that I can import into massive and see how it works. So it's not the most exciting posture, but it's one of many "mini" animations that I have to do for animation trees within massive.


One thing that I worked on for a great deal of time is the blend shape facial animations of the character, and the facial rig. A lot of people like to use sliders with their blend shapes, and what I have isn't too far removed from that, but I find it more intuitive to have a facial GUI that represents the expressions you want to give your character.


I've hit a hurdle this week, just as I did in my past project with blend shapes. Hopefully some sleep and contemplation will help me figure it out. For some reason, when I use the blend shapes to influence of the main mesh, other parts of the body start to deform. If I activate multiple blend shapes at a time, things get crazy, and the mesh looks horrifying. I've messed with input order and re-applying the blend shapes. I may have to export the skin weights, and start over with a new mesh. It wouldn't take too long to try, but I don't want to do it unless I absolutely have to.


Above is a shot of the blend shapes I have. Since the body of the character is one mesh, I had to use the entire body for the blend shapes, even though I'm only deforming the face. There is a way to use just the head, but it takes a few more steps than I'm comfortable with, and don't want to waste time right now trying to figure out a new way to apply blend shapes. If I can't figure out how to fix what I have now, I might have to look into it, but hopefully it won't come to that.


Another thing I decided to do was experiment with caustics in renderman for the various light sources that will be lighting the room. I decided to have the light emanate from crystals in ornate lamps placed throughout the chamber. I had messed with caustics before, but only in mental ray. It took a while to figure out who renderman dealt with it, and even longer to come up with the right look for both the lamp and the crystal.

As you can see pictured above, I spent time modeling, UV'ing, displacing, and texturing the lamp, as well as figuring out how to texture and light the crystal with caustics. Next up on the to-do list is to figure out what's wrong with my blend shapes, get some animations finished, and import them into massive and see how that fares.

Monday, October 18, 2010

Advanced CG Week 5

This week was a busy week, and encompassed both environment and character set-up. I decided to jump back and forth between the two rather than work strictly on one aspect of the animation. This made the work-flow less tedious, and I made a lot of progress in both regards because of it.

The first goal of the week was to get the main character textured. To do this I took the base mesh, imported it to Zbrush and created displacement maps for the folds of the clothing. I then painted it in zbrush, and exported it into photoshop for some finer detail.


Though it may be a bit hard to tell, I added a bit of dirt and grunge to the shorts of the character, as well as a bit of dirt on the boots and gloves. I wanted to give the main character a slightly worn look, but not make him out to be beaten, with tattered clothes and on his last legs. While I want him to appear fatigued, he will be in relatively good health in the animation. He'll be a little bit worse for the wear, but not destitute.

The second goal of the character was to get the skin textured correctly. I currently have subsurface scattering applied onto the skin section of the mesh. Even though the mesh is all one piece, I applied a separate shader to the skin so I wouldn't affect the entire body. Having SSS on a pair of shorts would be pretty strange.

The picture above shows a better shot of the slight variation of the skin tone through subsurface scattering. Various subdermal pigmentations show up depending on the intensity and angle of the light. Obviously there aren't any eyeballs in that shot, but that along with the scarf and shoulder-pads are next on the list of things to do.

Pictured above and below are shots showing the progress on the environment. Right now I have a lot of the chamber displaced and textured. Currently maya crashes every other render in Windows, but it's the only OS that has Zbrush so I have to stick with it until I'm finished texturing. So the progress of getting everything tweaked is slow, but steady. I've begun playing with the lighting of the room. It's still got a ways to go, especially since there will be multiple light sources around the room.

This shot above gives a general idea of how it will look. There will be lights on top of the center piece, as well as around the giant tablets circling the room, which will be taken care of tomorrow. I still need to play around with the light fog coming down from the ceiling, but that shouldn't be too difficult.

Going back to character stuff, I got a lot of things done with the character rig. It's got all of the controls in place, and situated how I want them. The skin is bound to the skeleton and I'm getting the deformations that I want out of it.


As you can see in the picture above, I've been messing with the skin weighting. It's going really well and after spending a good deal of time, I'm very pleased with joint creasing and bending. The hands took a ridiculous amount of time, but that's the price you pay for going all out with a 4 finger setup (my last only had 3).

Next on the agenda is to continue working on environment props such as the lights, get the eyes and scarf finished, and start figuring out how I'm going to do the shading and particle effects for my shadow dudes. I'll also need to make a sword, but that shouldn't take too long, since I made a base model for the pre-vis.

Monday, October 11, 2010

Advanced CG Week 4

This week was spent finalizing the character model and working on the rig. My main drawbacks were trying to figure how how I should connect the appendages to their respective body parts. Its a hassle trying to get the weight painting the joints so that various parts don't clip through themselves. Right now, the entire character is one single mesh, and I intend on applying different shaders to different parts of the mesh.


Above is a t-pose of my character with the joints in place and aligned properly. It is ready to have control curves be put into place and skin weights painted on the mesh.

On top of this base mesh I will put displacement and normal maps onto it to add detail to the clothing, such as ripples in the clock and creases in the gloves and boots.


The goal of the character design was to have exaggerated proportion, so his feet and and hands are enlarged, as well as the head. Currently I am working on styling the hair, and creating a scarf.


Pictured above is a picture of what will be holding the sword the main character is seeking. Behind it will be a mechanism that will react to the sword being taken from its proper place. It won't be quite as difficult to create, as I won't be relying on displacement maps in ZBrush to make it look good. It'll consist mostly of gears and concentric circles.


Lastly, here are several experiments in hair styling using shave and a haircut. It's my first time messing with it, so I've got some more learning to do, and I'm not sure if I'll stick with it or not. Right now it looks pretty bad, and won't render in anything but white. Also I'm unsure how well it will animate, so I'll be uploading some tests on that in the near future. If I can't get the look right I'll just end up making poly hair and call it a day.

Thursday, October 7, 2010

Advanced CG Week 3


Above is the most recent previs, with a few added shots, and some tweaked shots to improve pacing. While its hard to tell exactly whats going on, there are several shots that provide exposition for the story, and explain what has happened prior to the main character who I will dub as Lliam from now on.

There are close-ups of ancient tablets circling the room, with frescoes painted on them depicting the trials and tribulations one must go through to be granted access into the chamber. In the pre-vis there are just grey rectangular blocks, but in the final version they will be rough and eroded stone.


Above is the sculpted and textured center piece of the chamber. On top will rest the sword holder, or "altar". It needs a bit more work to make it look rougher, but I'm pretty pleased with it over-all.

Above is a slab that will have paintings on it. Right now I have three different versions that I will place in a circle surrounding the center piece. This one still needs a bit of work, and I need to illustrate the fresco, but that'll be a bit further down the road. The most important concern right now is the character model.